Now that you understand the benefits of having a guest Wi-Fi network. It’s really simple to set one up, so here’s a quick guide on how to setup guest wifi.
1 – Access your router’s admin page.
This is so that you can access your router’s settings and configure it to add a guest Wi-Fi network. Simply enter your router’s LAN IP address into the web browser which should start with http:// followed by the IP address. If you didn’t already know, an IP address is a set of four numbers separated by periods. It should look something like:
http://192.168.1.1
Where can you find your router’s LAN IP address?
Some routers may already be labelled with a sticker at the bottom or to the side of it. Alternatively, you can find out by:
On Windows: Run a command prompt box, type the command “ipconfig” which should display some output. Take note if the IP address that displays “default gateway”

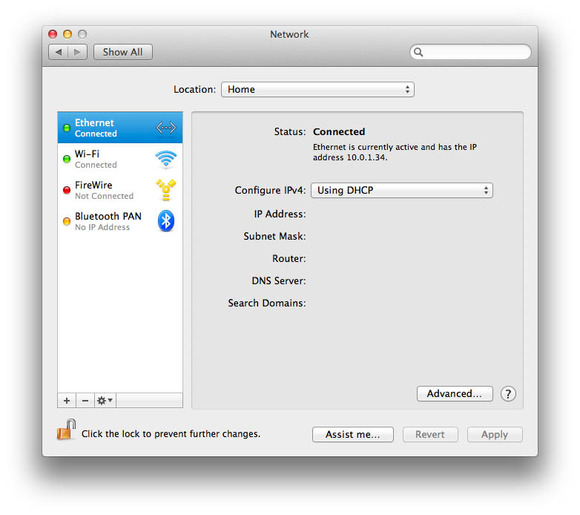
On a Mac: Enter network preferences, and then go to the “Advanced “ button, followed by the TCP/IP tab. Find “Router”, which will display the router’s IP address.
Apple device: head over to settings, go to Wi-Fi, then look for the “i” button to the right of your network name and click it. You should see the IP address under “router”.
Android device: This needs a separate App to view you router’s IP address. We suggest on to use called Fing.
Once you have your router’s IP address, type it into your web browser and access the login page. Simply enter your default admin ID and password (this should be labelled on your router). If unsure, you can contact your ISP (Internet Service Provider) to find out.
2 – Guest Network.
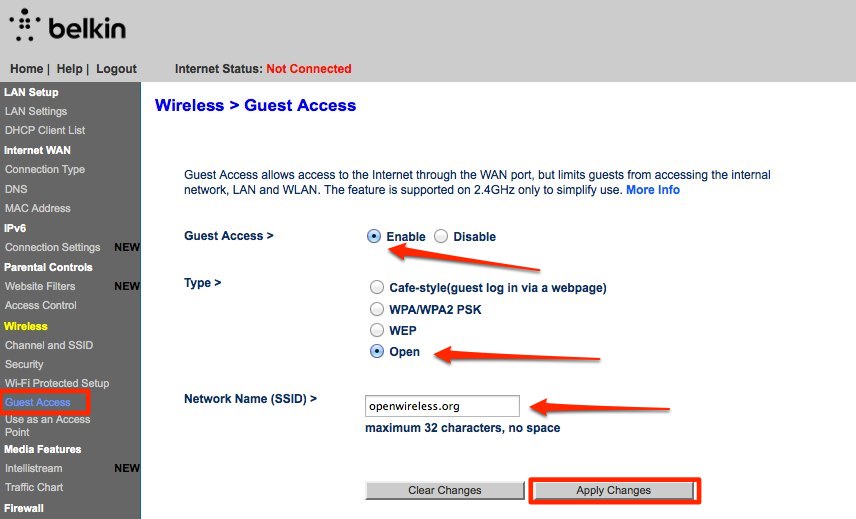
Once you’ve successfully logged into you router, you’ll see that you can configure its settings. Look out for a setting or tab worded as “Guest Network” or something similar to it. This can vary from one router to another. Note: that newer routers support guest networks, but some may not have this feature at all. Check your router’s packaging or manual to confirm if it has the ability to provide a guest network.
3 – Configure and save.
Enable your guest network by clicking on “enable”, along with any other preferred settings of your choice, save it, and you’re done!
It’s simple to do, right?
Now you know to set up a guest network so you can overcome the potential pitfalls mentioned in our previous article. Not only is this setup a win-win situation for all, you’ll also have peace of mind with having a secured LAN where nobody can see your private files, data or internet traffic, whilst maintaining a trustworthy relationship with your guests or customers.
For more ways to secure your home or office networks, contact your local IT professionals.